
|
v ----- Advertisement -----v
^ -----Advertisement ----- ^
|
Foamed gelatin make an ear that is easier to apply and blend with make-up than latex. Here is a step by step guide to making your own custom fix ears or ear tips. Note: this cannot be done in one weekend. There are drying steps. The supplies cost a bit to buy and the ears are not permanent. Also consider Buying Ears or if you need something for tonight.. check our ear quick tips. Warning: Kids, do not do this by yourself. Only under parental supervision. Regardless your age, it's better to do this with a friend. You are dealing with a number of chemical here. Follow the instructions at each step. Your ear must be completely seal by ear plug or plenty of cotton. It must be a complete seal on the edges. Index:
Ear Stories: Given that this is a complex procedure... and we're all learning, we're including some folks stories on what they went though to get their custom ears. They're fun reads... and you learn things from them. (Note: Entire page will take a few moments to load.) Resources
Specific supplies (Liz's favs)
Supplies ListBefore you start your project, make sure that you have everything on hand you need. See Sources at the end of this text. Supplies for Part I:
Supplies for Part II:
Supplies for Part III:
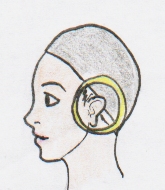
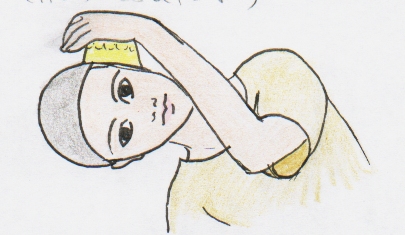
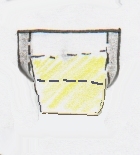
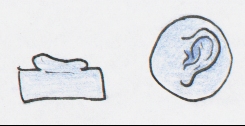
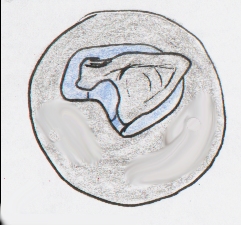
Part I: Making a Plaster Cast of your EarYou are going to be pouring Mold-Gel into you ear. You must make sure that the ear plug is firmly and complete inserted in you ear and that there are no gaps. If in doubt, test it. If you can hear out of it, you are probably not protecting your ear drum from the Mold-Gel. If you're not sure, don't do it. Step 1: Put swim cap on and put Vaseline on hair near ears. Mix 1 cup room temp. water with 1/3 Mold-Gel with electric beaters on low. Stir with hand to get air and most of the remaining lumps out. It should have very few, to no lumps. Step 2: Put the margarine tub with the hole over plugged ear with Vaseline coated around edge of tub.
Step 3: Pour Mold-Gel mixture into tub, making sure tub is firmly against head. Leakage is likely so be careful. Hold cup on until Mold-Gel is firm (about 5.5 minutes from when it touches water; sets faster the warmer the water is) If you even think you feel any of the gel on your inner ear, beyond the ear plug. STOP! Remove everything immediately and start flushing the ear.
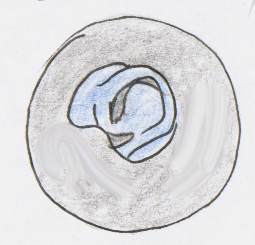
Step 4: Gently pry mold off of ear. The mold will be soft so pull carefully. Repeat steps 1-4 on other ear. Let molds dry for a few hours. Part II: Creating the "Positive" of your EarStep 5: Take the molds out of the tubs and put them in different tubs with the bottoms still intact. You may need to put a ball of clay in the bottom of the cup to keep the molds from sagging and therefore distorting. Make a wall around the edge out of clay about an inch high.
Step 6: Pour several inches of water into a mixing container for the plaster mix. Spread plaster on surface of water with your hand. When the plaster forms an island on top of the water and has a difficult time sinking in, shake the container so all the plaster is submerged. Wait 5 minutes to let the air dissipate. With hands, mix by squeezing out the lumps till it's smooth. Should have consistency of thin yogurt. Note: you will have to use a LOT of the plaster mix, just mix it in slowly before it starts to form up. Patience is needed. Step 7: Pour plaster into molds. Thump on table to get any and all air pockets and bubbles out. Let sit for at least a day. Step 8: Separate Mold-Gel mold from plaster mold once plaster is completely set. You should wait a week or so for the plaster to dry out good enough so it won't break easily (which it will if it's still moist). The casts should be put somewhere dry like a cupboard or cabinet. Using a craft knife, file off any lumps or imperfections and the shapes made from the ear plugs.
Part III: Shaping the "New" EarStep 9: Using modeling clay on molds, shape out what you want your ears to look like. Make the edges very thin. Fill in any undercuts with clay (including behind the ear), and cover the rest of the mold with a layer of clay, leaving a space between the clay of the part that would be the prosthetic. Build another wall around the mold that's higher than the ear (1 inch should be enough).
Step 10: Spray mold with silicon spray. . Step11: Pour another plaster mix into the mold (repeating step 6) Step 12: Gently separate the two molds. Remove clay from the positive that represents the prosthetic. Fill the undercuts in with clay again. Carefully make a space behind the ear by removing the clay from that area so that when the gelatin is poured in, the prosthetic will have a backside to it.
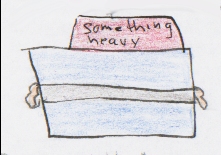
Part IV: Casting the EarStep 13: Coat positive and negative molds with silicon spray. Melt foamed gelatin in a container in the microwave (don't let it boil). Pour the melted gelatin into the negative, making sure it fills all spaces. Put positive into negative (gelatin will be displaced and squeezed out) and weight it (several large books, or even standing on it for a few minutes).
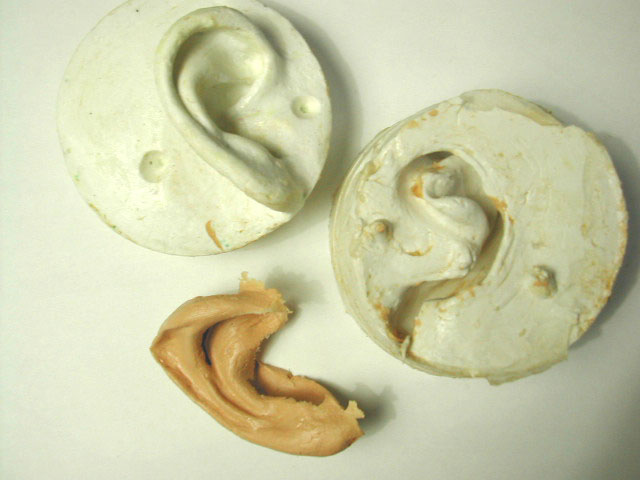
(not drawn to scale) Step 14: VERY gently pry apart molds, letting gelatin stick to whichever side of the mold it wants (usually the negative). Powder it with baby powder, and gently peel the gelatin piece out of the mold, and powder again (so it won't stick to itself). Trim off excess. Should look like the prosthetic and fit nicely on your ear. Color with makeup (cream foundations, blush, eye shadow). Attach with spirit gum or Pros-Aid. By repeating step 13 you can make as many as you want. Always be gentle because the molds can break.
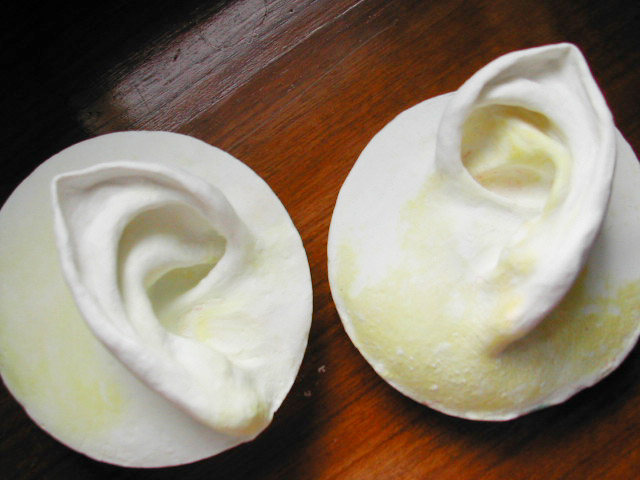
Here are the final results!
More experiences about making and casting the ears...
v ----- Advertisement -----v
^ -----Advertisement ----- ^
This page was last updated 04/22/08
|
||||||||||